Extraction Overview
Extraction pulls the exact fields you need out of a document and returns them as structured JSON. You define a schema describing the fields you want, and Extend returns each value with confidence scores and citations back to the source document. Use it to turn receipts, invoices, statements, contracts, and forms into reliable, machine-readable data.
How Extract works
Extract runs Parse under the hood: it first turns the document into clean, structured content, then uses AI to locate and return only the fields your schema defines, even across complex tables and layouts.
That targeting is what separates the two endpoints. Parse gives you everything in the document as structured chunks with positions and types — the right choice for RAG, document viewers, or feeding full context to an LLM. Extract gives you back only the specific fields you asked for, shaped like your schema.
Because Extract reads from what Parse produces, it can only return what Parse sees. If a value never makes it into the parsed content — an OCR miss or a mangled table — no amount of schema tweaking will pull it out. When a field comes back empty or is incorrect, confirm it appears in the Parse output correctly first, then refine the schema or parseConfig depending on whether the parse output is the issue or not.
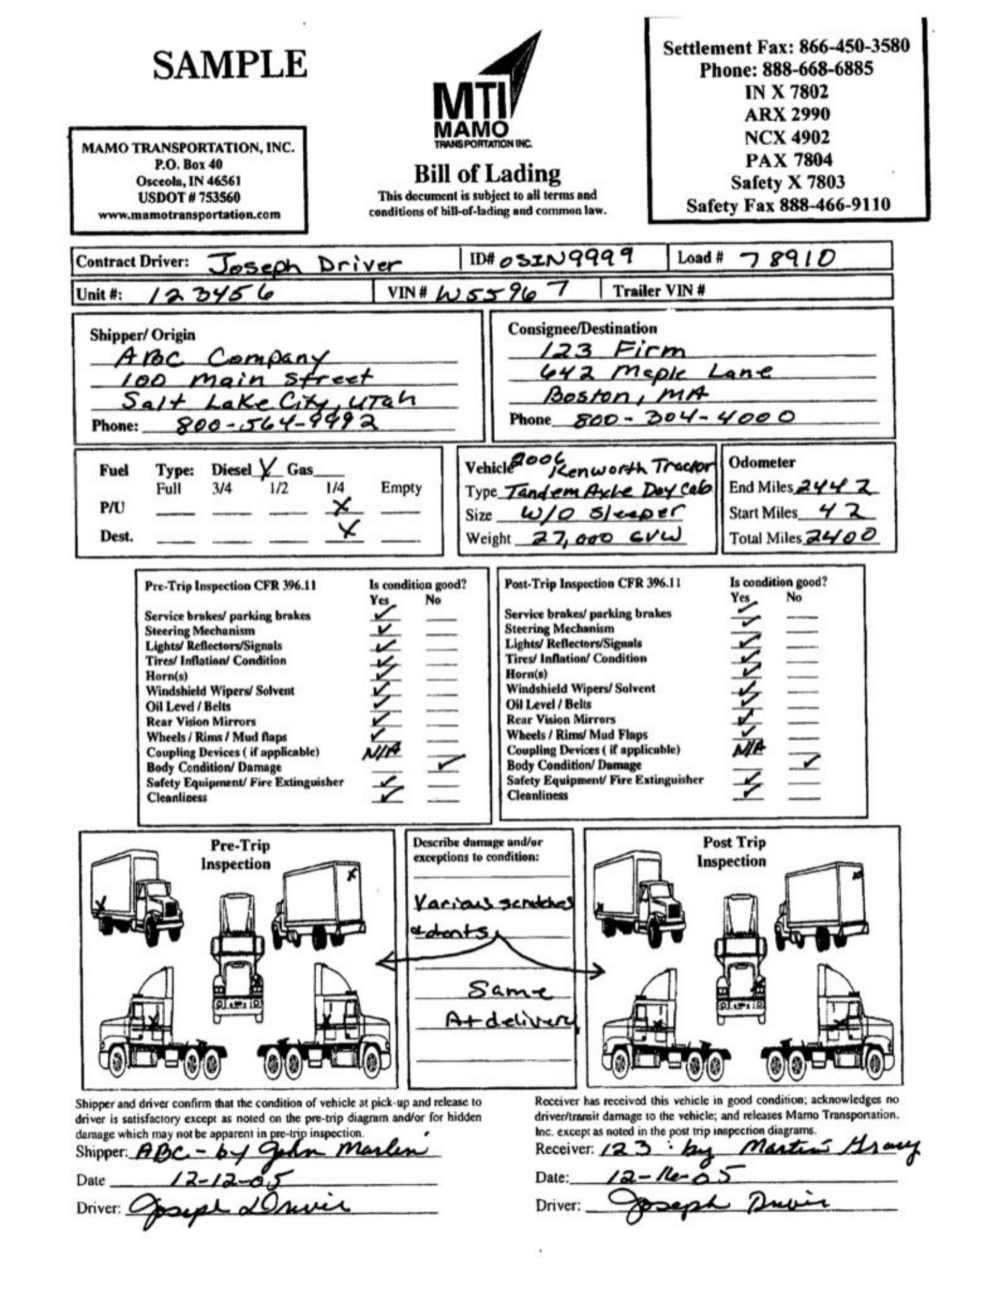
Quick start
We’ll pull a few key fields from a bill of lading. For this quick-start we’ve uploaded the file here.
Grab a key from the Developers page and store it as the EXTEND_API_KEY environment variable. If you’re using an SDK, see the installation instructions.
The /extract endpoint takes a file and a config with the schema you want to pull.
Python
TypeScript
Java
Go
cURL
Want to extract from your own document? Upload it first, then pass the returned file id instead of a url (reusing the same config).
Python
TypeScript
Java
Go
cURL
Example response
After you run the code snippet above, you’ll see a response like this. Extend parses the document, locates each field you described, and returns an output with two halves: value (your data, shaped like the schema) and metadata (per-field confidence and citations, keyed by the same field paths).
Key fields
For full request/response details, see the Create Extract Run API reference.
Use the output
Read your data straight off output.value, and use output.metadata to trust high-confidence values and route the rest to review.
Python
TypeScript
Java
Go
For the full shape, including confidence scores, citations, and insights, see Response Format.
Schema-less extraction (infer schema at runtime)
Don’t have a schema yet? You can omit config entirely (or pass config without a schema) and Extend will automatically infer a schema from the document before extracting. This is useful for exploring unfamiliar document types, prototyping, or any case where you want structured data without defining the shape upfront.
Use extractionRules to guide what the inferred schema focuses on:
Python
TypeScript
Java
Go
cURL
Once complete, config.schema in the response reflects the inferred schema so you can inspect or save it.
file.base64 is not supported when using an inferred schema. Use a url, a previously-uploaded file id, or raw text instead.
Sync vs async
The quick start above calls the synchronous /extract endpoint. We also have an asynchronous /extract_runs endpoint that should be used for large files and high volume use cases.
See Async Processing for the full comparison, polling options, and webhook setup.
Save it as a processor
The quick start runs with an inline config, which is perfect for getting started. To reuse a configuration across runs — and to version it, measure its accuracy, and optimize it — save it as an extractor, a kind of processor. Processors are the saved entities you iterate on in the dashboard, run evaluation sets against, and improve with Composer.
Configuration
The quick start sends just file and config.schema. To control how extraction runs, pass more options inside config. Here are the most commonly used ones; for the full reference, see Configuration.
Schema
The schema is the heart of every extraction — a JSON Schema describing the fields you want. Add array properties to pull repeating rows like line items, nest object properties for grouped data, and use extend:type for typed fields like dates and currency.
Base processor
Choose the processor based on your accuracy and latency needs.
Extraction rules
Steer the model with plain-language rules — useful for disambiguating fields, setting formats, or encoding business logic.
Citations
Return a bounding-box citation and source text for each field, so you can highlight where every value came from.
Generating citations uses an additional citation-focused model, which adds a moderate increase in latency. See Response Format.
Parse config
Because Extract runs Parse under the hood, you can tune how the document is parsed before extraction with parseConfig. Reach for this when a value isn’t being read correctly — for example, enabling agentic OCR for messy scans.
For every option, including advanced options, the review agent, and Excel settings, see the Configuration reference.
Multifile extraction
Both /extract and /extract_runs support extracting from multiple documents in a single run. Pass a package object instead of file:
The model sees all files together and returns one output.value covering the full corpus. The response includes files (an ordered array of file summaries) instead of file.
See Multifile Extraction for the full guide, including constraints, response shape, and how it compares to batch processing.